bind9 使っている宿命というか、どうしても定期的なセキュリティアップデートを実施しないといけない、というのが結構運用面での負荷になっていて、「どうしても bind でないといけないというところ以外、 unbound に切り替えてもいいのでは?」と思い始めたので、スレーブに unbound を使ってみよう、ということで設定をしてみた次第。
しばらく前から、unbound も権威サーバとして使えるということは、知ってたんですけどねぇ。
インストールと設定
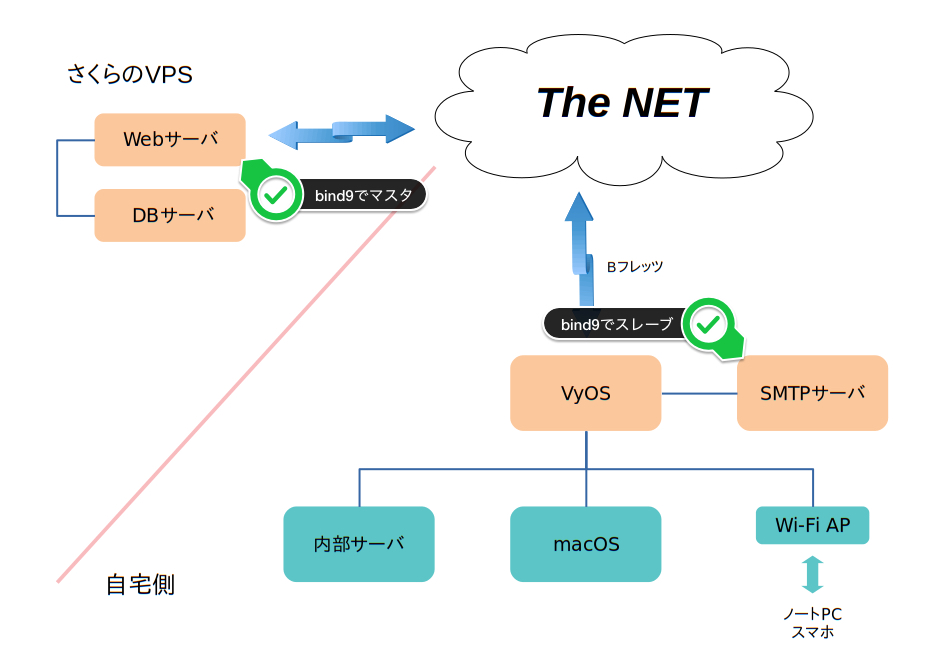
うちのネットワーク的には、さくらの VPS でマスタ、自宅側サーバでスレーブという形で DNS を配置しているので、自宅側を unbound で置き換えるという形に。
サーバは、いつもどおりの Debian で構築したものなので、 インストール自体は root で "apt install unbound" なり "aptitude install unbound" で完了。一応、-s オプションつけてシミュレーションモードで確認してみると、こんな感じ。
nexus01:~# apt -s install unbound

パッケージリストを読み込んでいます... 完了

依存関係ツリーを作成しています

状態情報を読み取っています... 完了

以下の追加パッケージがインストールされます:

  libpython3.7 libunbound8 unbound-anchor

以下のパッケージが新たにインストールされます:

  libpython3.7 libunbound8 unbound unbound-anchor

アップグレード: 0 個、新規インストール: 4 個、削除: 0 個、保留: 25 個。

Inst libpython3.7 (3.7.2-1 Debian:unstable [amd64])

Inst libunbound8 (1.8.1-1+b1 Debian:unstable [amd64])

Inst unbound-anchor (1.8.1-1+b1 Debian:unstable [amd64])

Inst unbound (1.8.1-1+b1 Debian:unstable [amd64])

Conf libpython3.7 (3.7.2-1 Debian:unstable [amd64])

Conf libunbound8 (1.8.1-1+b1 Debian:unstable [amd64])

Conf unbound-anchor (1.8.1-1+b1 Debian:unstable [amd64])

Conf unbound (1.8.1-1+b1 Debian:unstable [amd64])
unbound インストールの時点は、bind9 の削除がいきなり行われたりはしないようです。(というか -s オプション効くの、初めて知った…。)
実際にインストールすると、unbound を起動しようとしてコケるんですが、
Job for unbound.service failed because the control process exited with error code.

See "systemctl status unbound.service" and "journalctl -xe" for details.

Job for unbound.service failed because the control process exited with error code.

See "systemctl status unbound.service" and "journalctl -xe" for details.

invoke-rc.d: initscript unbound, action "start" failed.

● unbound.service - Unbound DNS server

   Loaded: loaded (/lib/systemd/system/unbound.service; enabled; vendor preset: enabled)

   Active: activating (auto-restart) (Result: exit-code) since Thu 2019-01-10 23:03:52 JST; 11ms ago

     Docs: man:unbound(8)

  Process: 4360 ExecStart=/usr/sbin/unbound -d $DAEMON_OPTS (code=exited, status=1/FAILURE)

 Main PID: 4360 (code=exited, status=1/FAILURE)
まだこの時点では、bind9 が起動しているので、
Jan 10 23:03:41 nexus01 package-helper[4288]: /var/lib/unbound/root.key does not exist, copying from /usr/share/dns/root.key

Jan 10 23:03:44 nexus01 package-helper[4288]: /var/lib/unbound/root.key has content

Jan 10 23:03:44 nexus01 unbound[4293]: [1547129024] unbound[4293:0] error: can't bind socket: Address already in use for ::1 port 53

Jan 10 23:03:44 nexus01 unbound[4293]: [1547129024] unbound[4293:0] fatal error: could not open ports

Jan 10 23:03:44 nexus01 systemd[1]: unbound.service: Main process exited, code=exited, status=1/FAILURE

Jan 10 23:03:44 nexus01 systemd[1]: unbound.service: Failed with result 'exit-code'.

Jan 10 23:03:45 nexus01 systemd[1]: unbound.service: Service RestartSec=100ms expired, scheduling restart.

Jan 10 23:03:45 nexus01 systemd[1]: unbound.service: Scheduled restart job, restart counter is at 1.

Jan 10 23:03:52 nexus01 package-helper[4323]: /var/lib/unbound/root.key has content

Jan 10 23:03:52 nexus01 unbound[4360]: [1547129032] unbound[4360:0] error: can't bind socket: Address already in use for ::1 port 53
port53 を bind9 が掴んでいるので、当然といえば当然。
とりあえず、このままの状態で unbound の設定していきます。
基本的な設定を行う /etc/unbound/unbound.conf.d/local.conf と
server:

	interface:		0.0.0.0

	interface:		::

	access-control:		0.0.0.0/0	allow
ゾーンの設定をする /etc/unbound/unbound.conf.d/slave_zones.conf の
auth-zone:

	name:			"downtown.jp"

	master:			153.120.6.47

	master:			2401:2500:102:2120:153:120:6:47

	fallback-enabled:	yes

	zonefile:		"/var/lib/unbound/zone_downtown.jp"

	for-downstream:		yes
2つの設定ファイルを用意。(別に、分けなくても大丈夫。)
上の設定例ではゾーンひとつだけですが、 ”auth-zone: 〜" の部分をスレープとして設定したいゾーンの数だけ書けば、複数の転送も出来ます。あと、転送されてきたゾーンファイルの置き場所を "/var/lib/unbound/" 以外にしたいときは、apparmor の設定もいじらんといかんので、その点要注意です。
#必要最低限の設定なので、あとは必要に応じて変更してくださいね。
起動、そしてゾーン転送の状況を確認する
設定ファイルが用意できたら、bind9 を停止後、unbound を再起動。
nexus01:~# systemctl stop bind9

nexus01:~# systemctl restart unbound
ここでエラーが出なければ、設定ファイルにも問題はないので、ゾーン転送が行われのかを確認します。
nexus01:~# ls -l /var/lib/unbound/
合計 28
-rw-r--r-- 1 unbound unbound  1252  1月 10 23:26 root.key
-rw-r--r-- 1 unbound unbound 20654  1月 10 23:26 zone_downtown.jp
/var/lib/unbound/zone_downtown.jp というファイルが出来ているので、ゾーン転送も成功していますね。
unbound-control コマンドで確認しても
nexus01:~# unbound-control list_auth_zones

downtown.jp.	serial 1271791428
マスタ側の bind9 のログでもゾーン転送の要求があったことを示すログが出ていますんで、問題なし、と。
root@vps2:~# grep -i axfr /var/log/bind9/query.log

10-Jan-2019 23:26:11.688 queries: info: client @0x7f482065c0e0 218.219.149.234#54730 (downtown.jp): query: downtown.jp IN AXFR -T (153.120.6.47)
これで、問題なく動作しているのがわかったので、サーバ再起動時に間違って bind9 が起動しないように、 systemd の設定を変更するか
nexus01:~# systemctl disable bind9

Synchronizing state of bind9.service with SysV service script with /lib/systemd/systemd-sysv-install.

Executing: /lib/systemd/systemd-sysv-install disable bind9
アンインストールするかして、完全に unbound に切り替えてしまいましょう。
と、これで完了です。マスタとなっている bind9 側は設定いじらなくてもよく、スレーブ側の設定だけで終わってしまうので、意外と簡単に出来ました。
今回の例だと、unbound 自身はほんと最低限の動けばいいレベルでしか設定していないので、実運用時はもう少し考える必要があるので、ご注意を。
#さて、ホントは RHEL/CentOS の環境で、これやりたいのだけど、 1.7 以降の unbound のパッケージをどうやって用意するかで悩んでる…。
トラックバック(1)
ただ、この時点では、転送されてきたゾーンデータは、 /var/lib/nsd/nsd.db にバイナリ形式で格納されているので、これをテキスト形式のソーン... 続きを読む
コメントする